-8.png?height=120&name=Oneserve%20logo%20(white)-8.png)
Summary
A schedule can be set to export Oneserve reports to multiple recipients as a PDF file. This file will be emailed out to the chosen recipients at the scheduled time.
If you choose to include a "PDF Link" component, you should be aware of what the PDF version of the report will look like.
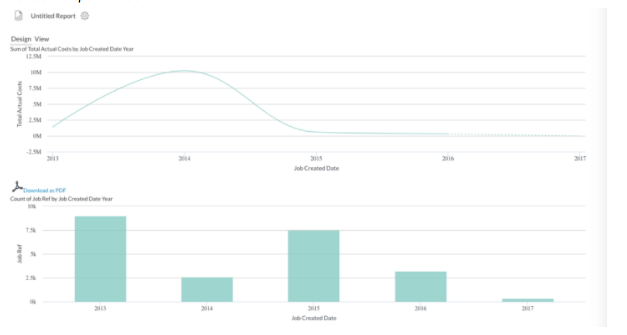
Viewed in Report builder:
Downloaded as a PDF:
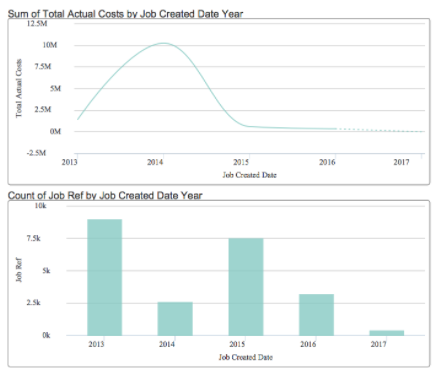
When the report is converted into a PDF, the internal report name, the Design and View buttons and the PDF Link component itself are removed. The example above shows the differences. This means you'll most likely want to include a Label at the top of the report, as its title, if you plan to use the PDF Link component
Guide
Scheduling Report Delivery
Note: While reports can be scheduled for automatic generation and delivery via email as a PDF attachment, dashboards and analyses cannot be scheduled
Scheduling reports is achieved via the home page
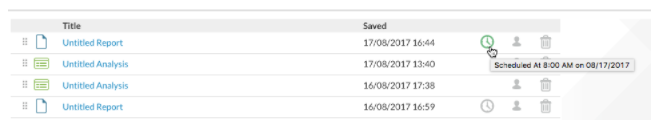
It's easy to see if scheduling is enabled for each item in your Home page list. If it is, a clock icon will appear, as shown above. If not, no icon will appear
When a report has already been scheduled, the clock icon displays green - The schedule details will also be shown in a tooltip, made visible by hovering your mouse cursor over the green clock icon, as shown above.
Select a report and click its clock icon to set up or amend its delivery schedule.
Report Scheduling Details
To schedule a report, you need to provide the delivery details and report generation frequency:
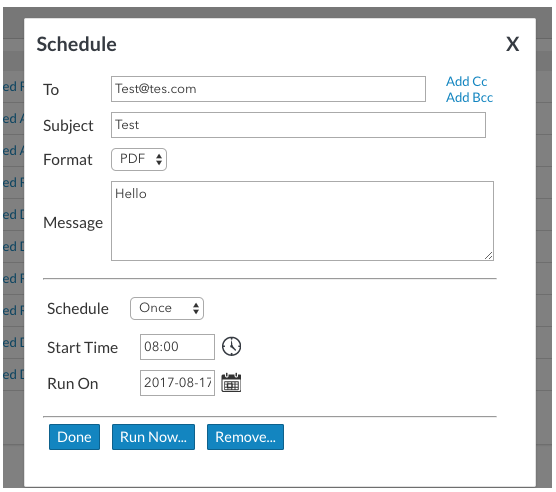
The Schedule panel is shown above. Its controls are:
- To - Enter the email address of the report recipient. Separate multiple addresses with a semicolon (";")
- Subject - Enter a brief subject description
- Format - Choose between PDF or Excel
- Message - Enter the text of the email message
- Schedule - Select the interval and frequency for generating and delivering the report. These options change depending on the initial selection and are described in more detail below
- Buttons - Select Done to save the settings. Click Run Now... to generate and deliver the report immediately. Click Remove... to remove this scheduled occurrence
Note: Time must be in 24-hour clock format - Date must be YYYY-MM-DD format
You can also click the "X" icon to close the panel, without saving any changes, at any time.
Schedule Options: Once
This option generates and delivers the report exactly one time:
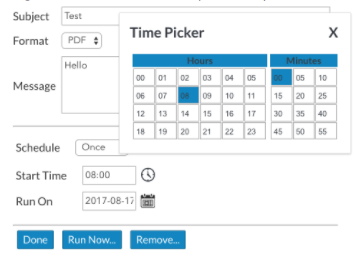
- Start Time - Format must use the 24-hour clock. You can select it from the Time Picker by clicking the clock icon, as shown above (selected time can be made more exact by editing it once it's in the input control)
- Start Date - the format must be YYYY-MM-DD, you can select it from a calendar by clicking the calendar icon
Schedule Options: Minutes, Hours, Daily
This option generates and delivers the report every X minutes, hours, or days:

- Every - Select the interval of minutes, hours, or days desired. Use caution if selecting minutes; repetitive short time intervals may impact server performance
- Start Time - Format must use the 24-hour clock. You can select it from the Time Picker by clicking the clock icon, as shown above (selected time can be made more exact by editing it once it's in the input control)
- Start Date - Format must be YYYY-MM-DD. You can select it from a Calendar by clicking the calendar icon
- End Date - An optional date for stopping the scheduled deliveries. The format must be YYYY-MM-DD, you can select it from a calendar by clicking the calendar icon
Schedule Options: Weekly
This option generates and delivers the report at various weekly intervals, on specific days of the week:
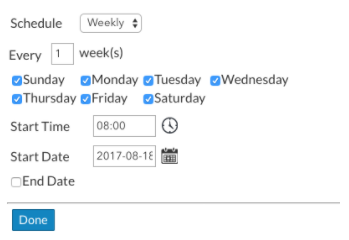
- Every - Select the interval of weeks desired
- Days - Use the checkboxes to specify the exact days desired
- Start Time - Format must use the 24-hour clock. You can select it from the Time Picker by clicking the clock icon, as shown above (selected time can be made more exact by editing it once it's in the input control)
- Start Date - Format must be YYYY-MM-DD. You can select it from a Calendar by clicking the calendar icon
- End Date - An optional date for stopping the scheduled deliveries. The format must be YYYY-MM-DD, you can select it from a calendar by clicking the calendar icon
Schedule Options: Monthly
This option generates and delivers the report on specific days in specific months:
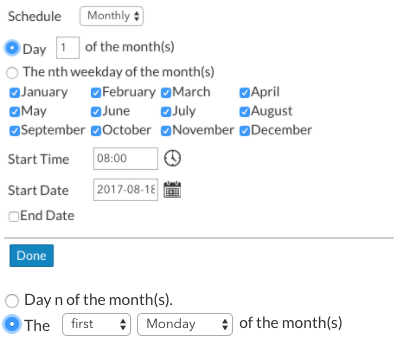
- Day X of the Month - Enter a specific day number, 1-31, for report delivery in each of the selected months. Ensure that the day number actually exists in each selected month (non-existent days will be skipped)
Or
- Nth Weekday - Select first, second, third, fourth, or last specific day of the week for report delivery in each of the selected months
- Start Time - Format must use the 24-hour clock. You can select it from the Time Picker by clicking the clock icon, as shown above (selected time can be made more exact by editing it once it's in the input control)
- Start Date - Format must be YYYY-MM-DD. You can select it from a Calendar by clicking the calendar icon
- End Date - An optional date for stopping the scheduled deliveries. The format must be YYYY-MM-DD, you can select it from a calendar by clicking the calendar icon