-8.png?height=120&name=Oneserve%20logo%20(white)-8.png)
Background
An Attribute is the base definition of a field and is used for Custom Fields or questions on Surveys. An Attribute is given a name and assigned a type which dictates it's behaviour. Attributes are arranged in Attribute Groups - this is simply a means of organising the attributes so they can be more easily managed.
User Type Right [Attributes ATT] - Access to the attribute config page under the admin menu.
Guide
Setting up an Attribute
- Select the Cog icon to open the Admin menu
- Select the attribute link under the other section
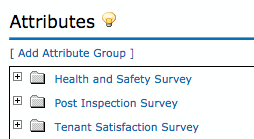
- Attributes are arranged in groups represented by folder icons. You can expand/collapse the folders to view the attributes by clicking the + or -
- You can add attributes to an existing Group or create a new Group.
- If you would like to create a new Attribute Group, click on [Add Attribute Group].

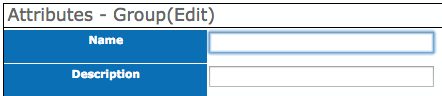
- Add a Name and Description, click the green tick to save the group.

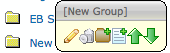
- Find the attribute group you just created in the list. Hover your cursor over the folder and a menu will appear. To add an attribute to the group, click the paper with a green cross icon.


- A form will appear below to add the attribute. Add a name and description.
- Pick the data type, this will be the type of data you wish to collect
- Character - Text field
- Integer - Number field
- Date - Will provider a date picker to enter the date
- Date & Time Will provider a date picker to enter the date
If you add ranges to the field it will add validation to check the information enter fits within the range.
10. Select normal or look up. A Normal field allows the user to enter a single value. A Lookup field allows the user to select from a list of predefined items.
11. Use the green tick to save.

12. If you have used the look up type you will need to create the possible answers. Once the attribute has been saved hover over it in the list and use the following icon to create the look up choices.
![]()
Complete the form and click on the green tick to save.
13. Repeat from step 7 to add more attributes.
Viewing Attribute Values
You can view the details of the attributes and lookup values you've defined by clicking on the attribute and the relevant form will display underneath.
Editing Attributes
You can edit the details by hovering over the item to bring up the tooltip and clicking on the edit icon (pencil).![]()
Deleting Attributes
You can delete the attributes by hovering over the item to bring up the tooltip and clicking on the bin icon.![]()
Next Stage
Assigning Attributes to Work Types, Site Types and Asset Types
Once you have created your attributes you will need to assign them to the correct types. This will determine where the attributes will be available in Oneserve.
Here is the link for Assigning Attributes