-8.png?height=120&name=Oneserve%20logo%20(white)-8.png)
What are Priorities?
Priorities are used to calculate a target date for completion of a job. When you create a job or move through a workflow transition the job can calculate the target date using the current date and the priority response time. Priorities can be set to exclude different days of the week or you can use the exclusion date functionality for specific dates, for example, bank holidays.
Priorities are required on every job. Different priorities can be set against different work types for example, emergency jobs, 5-10 day priorities for reactive work or a couple of months for planned works.
Permissions
User Type Right: Priorities [PRS] provides access to Priorities on the Admin page.
How do Priorities work?
Priorities are linked to different areas of Oneserve:
-
Work Types - priorities are mapped to work types. When you create a job and select activities, the linked priorities will be displayed in the priorities dropdown. A default priority can be added to work type.
-
Target Dates - priorities calculate target dates on a job. The target dates can be used on search views to report on jobs that have been completed within or out of target. RAG reports can also be created to monitor the progress for jobs depending on your internal targets or agreements with your clients. Target dates can be amended.
-
Notifications - priorities have a parameter to indicate whether an appointment notification is required.
-
Resources and Teams - working areas are allocated to resources and teams. These are postcodes which can be allocated using the primary coverage for non-emergency and emergency fields. In priorities, you have the option to turn on the emergency setting which enables jobs created with an emergency priority to use the emergency postcode coverage. This increases team availability even if a resource will have to travel outside of their standard working area.
Each resource is assigned services for their work role. Secondary services can be added for those services not part of their daily role but which they are able to complete. These are useful for emergency jobs as resources can carry out this work even though it's not part of their every day role. .
Creating a Priority
-
Click the Settings icon to open the Admin page.
-
In the Jobs section, select Priorities
-
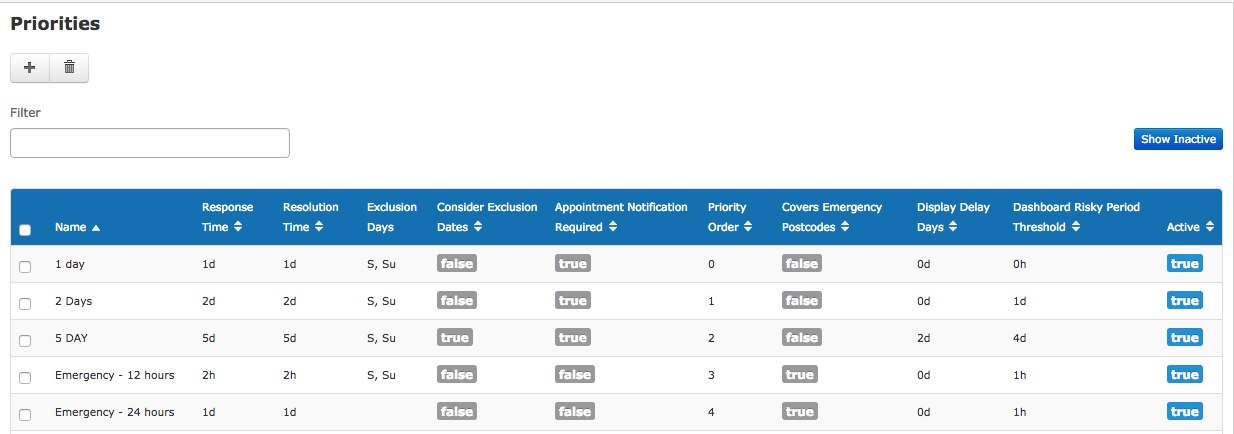
Existing Priorities it will be displayed in the list view.
-
Use the Plus icon to create a new Priority.

Complete the New Priority form

- Priority Name - Please note, priorities cannot have a name over 50 characters long. Priority names longer than this will cause an error within the system.
- Response Time - The response and resolution can be in days (d) or hours (h).
- Exclusion Days - This allows you to remove days of the week from the Priority and will have an affect on the target date on jobs. This is useful to exclude the weekends from standard/routine priorities.
- Priority Order - The order column will determine the place the Priority will appear in the Priority list on the Create Job screen. If you do not set an order the Priorities will be displayed in the order they were created on the system.
- Display Delay Days - This field relates to the day you open the scheduler. If the value is 0 you will open the scheduler on the current day, if the value was 10 the scheduler will start on the date for 10 days in the future. This can be useful for planned work with a long priority time.
- Dashboard Risky Period Threshold - On the search page you can use a column called Risky Date to highlight jobs that are at risk of exceeding the target date. For example, your job has a priority of 5 days so you could set your risky period to 4 days to allow jobs to be highlighted before they exceed the target date.
- Appointment Notification Required - You will need to turn this setting on if you use letter or SMS notifications. If you have an emergency job that needs to be attended within a couple of hours you could turn the notifications off because a letter notification might not arrive until a couple days after the appointment.
- Cover Emergency Postcode - If this field is turned on it will use the emergency postcode coverage assigned to the Resources when scheduling the job.
- Consider Exclusion Dates - Your priorities can be set to exclude particular dates such as bank holidays using the Exclusion Dates.
-
Click Save.
Note: If you already have a work type configured, you will need to assign the priority to your work type.